December 31, 2010

New Year's Eve (for kids)!

If you're reading this and thinking that you haven't done anything for your little family to celebrate New Year's Eve...its not too late!  I made up a couple quick things for us to enjoy with our kids tonight before midnight, of course.  


I whipped up some cupcakes (total time: 30 minutes - 10 prep, 20 to bake), let them cool, frosted, and garnished with sprinkles (my kids' favorite!).

Find these quick to print cupcake toppers here!

I just taped a itty bitty fork from my cupboard onto the backs of these toppers.  The kids will help stick the rest of the toppers in the cupcakes when they wake up from their naps.

I made these celebration hats (total time: 10 minutes) for the kids to wear while we eat and party!  This idea is from Mommyapolis and the quick tutorial can be found here.  She made her hats for 4th of July last year, but I thought they were perfect for any celebration!  The kids decorated with stickers (well, mostly I did the stickers because they lost interest).

There you have it.  A super quick, thrown together little New Year's Eve for kids.  You can do it, too!  We'll add a little take-and-bake pizza and a dance party and the night will be loads of fun!

Happy New Year, Mamas!


December 18, 2010

(Un)Crafty - Wire Frame

This is really an (un)crafty project!  I took a frame, removed the glass and backing, stapled some wire to the back and voila!

This frame is 24 inches x 36 inches.

Now I can change photos, artwork, and season decor with ease in our family room!

Easy project (can you even call that a "project"?!).

December 12, 2010

Holiday Traditions

The beauty of the holidays are traditions.  Traditions make that magical feeling we all love so much about that wonderful time of year.  We have a few holiday traditions in the works.  We do not have family in town so sometimes we travel on holidays which doesn't always lend itself to creating many traditions at home.  Now that the boys are getting older and more into tradition, Hubby and I are too...

This year, we started a new tradition: "The Elf on the Shelf".  We love this adorable story that has created a great new tradition for us.  The book is wonderful and at the end there is a page to mark the date of the start of the tradition for your family and the name of your elf.

Image from potterybarn kids

Each night your elf magically travels back to the North Pole to report back to Santa.  Then, the elf is in a few spot in the morning than the day before.  The boys love getting up and looking for...

Zippy.
That is what we named our elf.

This is our other tradition.  I'm still working out some kinks.  Last year, I made this felt advent calendar but the boys weren't really into it.  This year, I made a little Christmas tree out of tag board and got some felt stickers.  Each day, we take out the stickers and decorate the tree a little more.

I admit that I would like this tradition to be more centered around the real reason for Christmas.  Next year I hope to be a little more prepared with some nativity pieces, bible verses, and stories from the birth of Jesus.

What are your favorite holiday traditions, mamas?


December 10, 2010

Baby Gift

I am so excited because I just ordered this adorable gift from The Baby Bunch for my good friend who just welcomed her first baby girl.  Have you ever seen anything cuter?!

Pink Birdhouse Pajamas

December 6, 2010

Do you do this? {Book Advent Calendar}

Do you do this? {Book Advent Calendar}

I love this Book Advent Calendar idea for next year!

(Un)Crafty - Starburst Mirror

You have seen starburst style mirrors everywhere.  They are cool.  And usually expensive.  I saw this tutorial on Honey We're Home how to make my own and I thought it was worth a try.  I used chopsticks (available at party supply stores...or your favorite take-out restaurant), bamboo skewers, a cheap 5" circle mirror from JoAnn's, a hot glue gun and metallic silver spray paint.  It was so simple!  I think the whole project only took about 30 minutes from start to finish.  The mirror ended up being pretty big, so I didn't have a place for it, but it was perfect for my mom's bathroom, so she has it hanging in there!  I encourage you to try this project for yourself or for a gift!  Visit the tutorial for steps to follow!


December 4, 2010

Amy Lou Jewlery

My super crafty, super trendy little sister launched her Etsy site yesterday!  Amy Lou Jewelry has cute, affordable, up to date accessories.  You have to see the earrings, bracelets, and necklaces she has created so far.  Of course, she would love to create a custom piece for you, mamas!  With prices like these, we can always have the perfect accessory.  A few of my favorites so far: the Ava Earring, the Amelia Bracelet, and the Addison Necklace.

So...what's your favorite???

December 3, 2010

Rudolph Cookies!

Adorable Rudolph cookies made by our friend, Jen.
What child (or adult) wouldn't love these festive Rudolph cookies?!  This special reindeer is pretty popular at our house, so the cookies our friend, Jen brought over last weekend were a huge hit!  Here's how to make them...

1 package of Pillsbury Simply Peanut Butter Cookies
M & M candies (for eyes and nose)
chocolate covered pretzels (make your own OR buy them already dipped!)
frosting (just a bit: to attach M & Ms)

Directions:
Form each cookie into a slight triangle shape before baking.  Bake according to package.  Cool for 2 minutes, then press pretzels into cookie for antlers.  Continue to cool cookies completely, then add small dots of frosting to attach M & M candies for eyes and nose!  Voila!  Thanks to Jen!

December 2, 2010

Crunchy Craisin Salad

As usual, I can't take credit for this recipe.  A friend, Molly, started bringing this salad around years ago and now its a staple for my family, too.  We especially like this tasty salad around the holidays - its so very festive!

Crunchy Craisin Salad:
1 head of broccoli (cut into small florets)
1 head of romaine lettuce (cut)
1 package ramen noodles
1 cup pecans (chopped)
1/4 cup butter (melted)
1/3 cup brown sugar

Toss cut broccoli and cut lettuce in large bowl.  Set aside.  Combine dry ramen noodles, pecans, butter and brown sugar in oven-safe bowl.  Stir until noodles and pacans are coated.  Brown in oven at 350 for 10 minutes.  Remove and allow to cool.

Dressing:
1/2 cup sugar
1/3-2/3 cup canola oil
1/4 cup red wine vinegar
1/2 tablespoon soy sauce

Toss all ingredients together and garnish with craisins.  Enjoy!

November 29, 2010

Try Shutterfly Photo Cards

I have used Shutterfly for holiday cards, birthday announcements for my kids, regular photo prints and enlargements, and photo books.  I find the quality at Shutterfly to be great, the service and shipping to be fast, and the product options endless.  Many of my friends upload their photos to Shutterfly as a "safe keeping".  Then, they are sure to get them printed easily and add to their baby books, frames, and dad's office.


As I said before, I ordered my Christmas photo cards early this year.  However, we send out a lot of cards and I had to skimp on my list a little.  So, for the second round, I like this simple and cute photo card from Shutterfly!  


They have so many cute cards...after looking through, here are some of my favorites:
Bright Merry Story Card, Cranberry Joy Card, Glitter Glamour Joy Card, and the Love 2010 Card.


You can choose a card with one photo, several photos, and even one with room for text and updates about the year's happenings in your family.


Besides your photo cardshttp://www.shutterfly.com/cards-stationery/christmas-cards,


you can find other great gift ideas like wall calendarshttp://www.shutterfly.com/calendars/wall-calendars,


or photo mugshttp://www.shutterfly.com/photo-gifts/photo-mugs,


or even birthday invitations and announcementshttp://www.shutterfly.com/cards-stationery/birthday-cards-stationery!


The options are endless at Shutterfly!  Go ahead, take a peek and enjoy browsing around.  Remember, Thanksgiving has passed and Christmas is on its way soon, so get your cards printed now!


If you are a blogger and you'd like to share, you can receive 50 free cards from Shutterfly by entering here.


November 28, 2010

Grocery List

Unfortunately, I am not good at meal planning.  I know it helps with shopping and the stress of "what's-for-dinner".  I'm trying to get better at it - and limit the number of times I visit the store during the week.

One thing that has helped me is this weekly meal planning sheet from Aby Garvey at Simplify 101.  The list has a place for your daily schedule that helps you see how the day's activity is going to affect your meal plan.  We live a crazy life (as all of you do, too!) so this is a helpful feature for me!  Continue on to read her "10 Tips to Simplify Meal Planning" for more great tricks!

Right now, Aby is offering a free one-on-one organizing session with a lucky winner from her blog!  Check it out and leave her a comment to WIN!

November 23, 2010

(Un)Crafty - Lamp Shade Redo

The lamps in my house have had many lives.  I think lamps are expensive and hard to choose.  All of my lamps have come from clearance somewhere and have then been given some sort of fix-it treatment or makeover.  The lamp in our living room is the latest revamp.  I painted the base with a spray primer and then a classic gray gloss coat.  Next, all I had to do was recover the shade.  I followed Alissa's tutorial for covering a lampshade.  It was easy and turned out so great that now I want to recover every single lamp in the house!

It started with my shade - in terrible condition from many-a-redo - and just enough fabric.

My crafty sister helped me because she has done lamps in her house, too.  We traced the shade on paper, then used that as a pattern to cut the fabric.

We used this spray adhesive to stick the fabric to the shade.  It was so easy!  We sprayed the fabric with the adhesive, then just smoothed it over the shade.  Seriously easy.

I trimmed the edges down.  Then I took the hot glue gun to the edges to fold them over nice and tight.

The final step for me was to add this bias tape (available in every color!) as a detail around the top and bottom edges.  This is totally optional.  I just used fabric tape (called Res-Q Tape) - a double sided tape especially for fabric from JoAnn's to stick the tape to the shade.

Here you can see the detail of the bias tape.

The finished product.

I am so happy with the new life this has given my super old super cheap lamp.

And she looks pretty in my living room!  Hooray!

November 20, 2010

(Un)Crafty - Glass Rock Magnets

This is a truly uncrafty project - perfect for people like me!  Last weekend we were in a snowstorm and it was perfect for staying in and crafting away.  So we did!  I was with my mom and sister (helpful to be around super crafty people when I'm less-than-crafty) and we did zillions of these glass rock magnets.

Tools you will need:
- glass filler rocks (available at Michaels and other craft stores)
- a clear gel adhesive (like Martha Stewart clear gel adhesive - available at Michaels)
- hot glue gun
- magnets
- scrapbook paper
- scissors


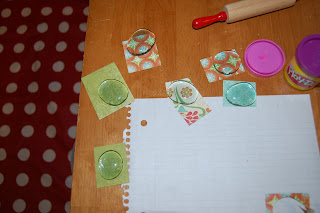
Glass rocks have one domed side and one flat side.  Lay them out flat and get ready to trace.

Since each rock is unique in size, I traced one at a time, then cut around the traced circle and left the corresponding rock on top.  That way, I didn't lose which rock fit on which paper.  Once I had several, I cut them and glued them all together.  As you can see, my son had a little play-doh fun going on at the same time.

Once the paper is cut, apply a small amount of the gel adhesive and press together.

Once the adhesive seems dry, you can apply the magnets.

Use your hot glue gun to attach a magnet to the back (the flat side) of each rock.

I really love these magnets!  It was such a fun, easy project!  They look so lovely and decorative on my magnetic board.

These magnets are so inexpensive, you could easily make seasonal sets to give as gifts!  I think these might be great teacher gifts...


November 19, 2010

Starbucks Doubleshot Cupcakes

Ok...these are the first cupcakes I have ever made from scratch.  It was a big deal.  They are nothing short of amazing.  If you are a coffee-lover like me!  They have a great consistency, are soft, and not too sweet.  The recipe is from Hope Studios.  I am copying the recipe on this post, but its a little less decadent than her recipe that includes buttercream frosting, caramel, and chocolate covered coffee beans.  Find her exact recipe here.


Starbucks Doubleshot Cupcakes

1 2/3 cups (8 1/2 ounces; 240 g) plus 2 T sifted all-purpose flour
1/3 cup unsweetened cocoa
1/4 t. baking soda
1 t baking powder
1/4 t salt
1 cup (2 sticks, 230 g) lightly salted butter (not margarine), at room temperature
1 1/2 cups (10 1/2 oz; 300 g) granulated sugar
2 large eggs, at room temperature
1 small can Starbuck's Double Shot Espresso and Cream (6.9 oz can)
1 t. vanilla extract


Preheat oven to 350 degrees F.

Measure flour, cocoa, baking powder and soda, and salt into a bowl and whisk to mix. Set aside.

Cream together the butter and sugar until smooth. Add the eggs, one at a time, beating after each addition.

Alternately, add the dry ingredients and the Starbuck's Double Shot, beating after each addition, beginning and ending with flour. Scrape down the sides of the bowl and the beaters. Stir in the vanilla extract.

Spoon batter into the cupcake papers, 3/4 full. Bake in the preheated oven for 20 to 25 minutes. Cool completely.


Thanks to Hope Studios for great recipes...I'll be trying this Cinnamon Streusel Cake soon!

Thanksgiving Centerpiece

This is what's planned for our house today:

Photo from Mommyapolis
I love this little craft from Mommyapolis.  I've been wanting to do this with my boys and we have the perfect little pumpkin!  I figure this is a good time to get our Thanksgiving centerpiece all set to go!  Can you believe the holiday is next week?!

November 8, 2010

(Un)Crafty - Chalkboard Charger

Maybe I'm becoming a little less "uncrafty" because lately I feel inclined to make-something-out-of-something-else.  A little confusing.  For example, I found this metal charger on clearance at Target a while ago and knew it could be something neat...

I liked the circular shape and the cut-outs.

It was even more on sale...like $2.06 or something.

I had bought this chalkboard spray paint on clearance at Michaels and I was just waiting for a chance to use it.  So, I scuffed up the metal, wiped it off with a wet rag and primed it.  
Total time: 5 minutes or less!

Then I sprayed a few coats of chalkboard paint all over the charger.  I think I found out why the paint was on clearance: the nozzle drips and leaves yucky blotches all over the piece.  But, I plan to sand it and try a couple new coats for a more even finish.

I think I mentioned before, but I'm not really crazy about wreaths, which is why I love this chalkboard charger on my front door for now!  Total time for this project: about 30 minutes (more for each coat of spray paint applied).  This piece can also hold magnets and be used in many placed throughout my home!  Definitely worth it!

November 2, 2010

(Un)Crafty - Subway Art

A few months ago I embarked on the journey of creating my first piece of subway art.  You've seen all kinds of subway art all over Blogland lately and I was dying to try it on my own.  Well, the journey was not exactly blissful.  This quickly became the project from you-know-where.  Yikes.

I started with visions of creating something like Vivienne or Ashley at Lil' Blue Boo.  In the end, mine doesn't really look like either of theirs...oh well.

I started with a simple word document on my Mac.  I added words that are meaningful for my family in different sizes, but all in the same font.  I spaced the words so that each line filled the page to the edge.  I printed the page on a regular letter size piece of paper and then took it to FedEx Office (formerly FedEx Kinkos) and had it enlarged to the size of my canvas (24 x 30).  I spray painted my canvas white.  Then I used spray adhesive to attach the large paper to contact paper and cut the paper into strips, as you can see below.

I laid the strips out on my canvas to check the spacing.


Then I marked where each line should be and where each letter should be.

The next step was to cut out each letter.  It took me forever.  I would recommend a different strategy!  It took lots of patience and a sharp scissor to get all those little letters nicely cut.  Keep in mind, everything had to be done while the kids were napping, after bedtime, or some other rare time when I was "off the clock".

Finally I got all the letters cut out and stuck on the canvas.  Because I attached the paper to contact paper, I was able to pull the backing off and stick the contact paper to my canvas.  Here's the bad news: it didn't really work for me.  The sticky part of the contact paper didn't want to adhere to the canvas - I don't know why.  So, I ended up spraying each letter with a removable spray adhesive (3M, of course) and sticking it on the lines I drew.  Even with the spray adhesive, the letters weren't adhering as well as I wanted.

Here you can see the letters stuck to the canvas and the original word document I used.

My intent was to get the letters stuck on really well and then roller-paint a dark grey color over the whole canvas.  I envisioned nice neat and clean words on the canvas.  However, I could tell right after I stuck the letters on that they wouldn't stay stuck with a roller going over them.  Bummer.  By this point, I was desperate to finish the project and checked the cabinet for spray paint.  I had a full can of black, so I decided it was my best bet.  I sprayed the thing like crazy and was happy with how easy it was to get it covered so quick.

After the spray paint...

and with the letters pulled off.

The lines were really not clean, so I tried to touch up the edges with a white paint pen, but it was just too daunting of a task.  There was so much to do and I didn't have any patience left.  So I started thinking of what I could do to rough it up a little and make it look like I wasn't trying for it to be so perfect.  Keep in mind, its a canvas, so it pretty delicate.  Sanding wasn't really an option.

I decided to use a metallic glaze to see if I could give it a more vintage look.  This is the result.  It looks like a white-washed canvas after several coats of the glaze and then wiping it off with a wet rag for texture.  I feel like the project was a failure so the canvas is hiding on a wall in our bedroom for now.  Hubby says he really likes it and he likes the white-washed look much better than the contemporary look of the black and white.  I would like to see if I could get Hubby to build a vintage-y frame for the canvas, then maybe it would look more complete.

Overall, this project was SO MUCH WORK...especially for feeling a little like it failed.  But, as always, its fun to have a project and see it through to completion, even if its a different result than I first desired.  For someone UNCRAFTY, like ME, I think my next subway art venture will include vinyl letters or chipboard - something less committal!

If you would like more information about the products used or more about my method (and my recommendations for changing the process, contact me!).